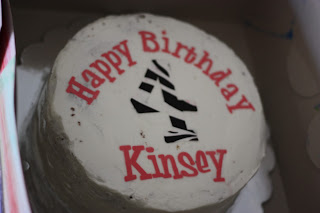
I googled how I could cut them with my Silhouette. I got some good information but nothing on how to do it EXACTLY. My girls birthday was coming up so I thought I would try them out. Of course, I did it the day before just in case it didn't work and I had to go to plan 2. This is what I did and it worked beautifully.
Prep for the Silhouette:
- I bought a sheet for the Cricut cake and cut it to fit in my Silhouette
- I also got a blade that I will now use just for icing
The trick is to only take the icing out right before you need to cut them. If it is out too long, it will get brittle.
- I created my design on my silhouette machine
- I took the icing out of the bag and put it on the cricut sheet, I kept the clear backing on.
- Tape the icing to the sheet. Tape both sides - you will waste a little icing but it is worth not having it slip since the cricut cake sheets aren't adhesive.
- Cut the icing using thickness of 20 and speed of 2. This may be different for different brands but it worked great.
- Remove all the negative space and then I rolled off the design.
The icing doesn't really have a flavor - just a little chewy.
I liked how it looked. However, I frosted it with butter cream before and I would prefer to use fondant as I think it looks smoother.


I love how they came out. My kids b days aare coming up too, great idea.
ReplyDeletethanks for sharing at tip toe thru Tuesday
that's so cool! i can hardly figure out how to get mine to cut paper and vinyl, let alone somethign like this. looks so great! thanks for linking up to tip-toe thru tuesday!
ReplyDeleteCool! Thanks for linking to Things I've Done Thursday!
ReplyDeleteWow--didn't know you could do this! Thanks for linking up to Share the Love Wednesday!
ReplyDeleteMary